Showing posts with label bags. Show all posts

Monday, June 3, 2013

Gifts to Mwanza

I mentioned and showed previously the fabric bought in Mwanza and the table runners I made. One of the table runners I had made as a gift for Tammy, the American Missionary couple we stayed with. I also made gifts for some other ladies there, that have a place in my heart, along with Tammy.

I made these needlecases, embroidering their initial on the front.

Also a Japanese knot bag each. I used the pattern from Mirkwood Designs where you can make it with or without a base. I used the one without the base. Also in the past have used this pattern from littlegemsession.

Another gift for Tammy was this County Carry Bag in the Australian HOMEMADE 2005 Vol 22 No 2 magazine. Which I posted about on March 1st.


These are the photos I received from Tammy after they were happily received. I was glad they arrived safely as it took nearly a month to get to Tanzania from Australia.


Tammy's photo with the table runner on her table and the country carry bag hanging on a bag hook off the table.


Thursday, August 12, 2010

Re-cycled Denim Jean projects

More projects for Item 2, on my 52MMMC list – using re-cycled jeans.

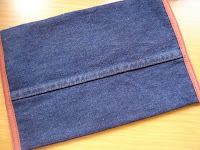
I made a “masculine” cover, using left over denim from the first pair I’d been cutting up, for my husbands new iPad. These jeans had top stitching already done in medium brown thread, so I continued that theme, top stitching where I could. I had some old plain brown fabric that matched well, to use as the lining and binding. I finished off by top stitching the brown binding in dark blue thread.


A great find in a second-hand shop some weeks back were jeans going at a $1 each. I picked out a pair where the denim was still a very nice dark colour. It also had a light blue cording set into the side seams. I made another bag this time working out the pattern as I went, with knowledge gained from the Make-A-Bag-Sew-Along.

I didn’t want to undo the seams where the blue cording was so that was left complete and I then sewed in a centre panel of fabric. This fabric is a Windham Fabric line “Sally Rose” ca. 1845-1865.

To make the bag base for making the box shape and to have enough denim, I had to sew a couple of pieces together, then set this in a bit as the “jean leg” panel flared out a bit as it went down to the base of the bag.

I wanted to be able to close my bag with a zip, and spent hours trying to figure it out thinking of the toiletry pouch and gathered clutch I’d previously made. But I had help from a fellow scquilter (Southern Cross Quilter's yahoo group) who pointed me in the direction of “how to insert a concealed top edge bag zipper”.


So I was able to accomplish this. Although in the tutorial she took the zip apart, I didn’t do that, just carefully made and sewed the fabric casing each side of the zip and achieved the same result.


I made denim straps using what long length I could cut from the left over jeans, which were 20 inches x 3 ¼ inches. I folded the denim in half and pressed in a ¼ seam down each length and top stitched these seams together, then a line of top stitching on the fold, to have a nice finish.

I cut the selvedge off with the fabric name on it and made a loop that I caught up in the lining seams to attach keys too.


I have really enjoyed these projects, loving the look and feel of the denim.

Make A Bag Sew Along - finished

Item 3 on my 52MMMC list – is now completely complete!! I made the last two items for this set in the Make-A-Bag-Sew-Along, which were the sun-glasses case plus the bits-and-pieces pouch.

The complete set is made up of the tote, toiletries pouch, mini make-up roll, sun-glasses case and bits-and-pieces pouch.

* - * - * - * - *

The Biscornu in my previous post – I had some one ask, “what is a biscornu?” This link gives the definition and how to make one.

Friday, June 4, 2010

A Bag Sew Along on . . . MAKE

Kelly is having a Sew Along using a charm pack and a bit of extra fabric....

You can make your own charm packs by cutting out squares.

Drop over to Kelly's blog and read what you will need, to make a great set of bags and accessories. She has listed what you need to get together, to start sewing along with her over the next eight weeks.

I think the set she has made is just beautiful, so image the fun we can have using our own favourite colours and fabrics!!


HOME TOGETHER

My men have arrived safely home after their two month's travel. Just suffering the dreaded "dehli belly" which makes for discomfort at the moment. However, its great to have them home. They have amazing stories to tell of people and sights, and just a testimony of God's protection and direction all the way.


Tuesday, July 7, 2009

Amy Karol: "Bend-the-rules Sewing"

A while back I saw someone mention on their blog about the book “Bend-the-rules Sewing” by Amy Karol. She has a blog as well. What was said, the project made and shown, got me interested. So I got a hold of the book.

I mentioned my daughter knitting in my previous blog, so from Amy’s book I made two of the “Charming Handbag” - one for my daughter’s knitting and one for me (mine has the crocheted heart on it)!! I made it from a fine corduroy.


After that I made the “Artsy Clutch”, “Pleated Beauty Bag” and the “No Cash Wallet” (Why that name? it’s to carry loyalty cards, credit cards and so forth). I made them as a set.


The front panel for the “Pleated Beauty Bag” I used a design from Cinderberrystitches. I also used an element from this stitchery design for the “No Cash Wallet".


I really enjoyed making them.